My list of things to do. Stay tuned!


Make a hollow book
Sew a quilt out of T-shirts
Make mittens out of old sweaters
Cook more with whole grains
Make framed jewelry holder
Make shirt embellishments
Sew window curtains

Wednesday, July 6, 2011

Homemade Wheat Sandwich Bread


Greetings.
I finally found a morning full of motivation and whipped up some bread loaves to get us through the next couple of weeks. Although I have included the recipe below, if you are a beginner baker I would strongly recommend looking at this post which is the original recipe that I have since adapted. There are step by step pictures and instructions that are amazing for your first bread experience. In the original recipe she made white sandwich bread, but below you will find my wheat version. It is not whole wheat, but it is the healthiest, easiest version I have come across so far. I have tried baking 100% whole wheat breads before but they take a lot more time (some recipes up to two days), and I'm not convinced it's worth it. If I do find a recipe that's worth it, I'll be sure to share.

NOTE: If you do not have wheat gluten on hand I would probably just make the white flour version (from the original site). The gluten helps your wheat to rise and ensures you get a soft baked texture. If you do not include it, your bread won't rise as well and will be dense.

2 cups lukewarm water (think of it as a nice bath for your yeast)
2 Tbls. sugar
1 Tbls. dry active yeast
2 Tbls. butter, softened
3 cups all purpose flour + more for kneading the dough
2 cups whole wheat flour
2 Tbls. wheat gluten
1 Tbls. kosher salt

Mix water and sugar - wisk

Add yeast to mixture - wisk

Let it sit for about 5 minutes to make sure your yeast is alive. It should have bubbles and start to look creamy.

Cut up the butter and add to bowl along with all the other dry ingredients. You will want to spoon your flour into the measuring cup and level it off with a knife to be the most accurate.

Use a spatula to mix it as well as you can, then transfer to a floured surface and knead for about 8 minutes. You might need to add more white flour depending on how absorbent your wheat flour is. I have the flour measurements this way because you can always add more flour to get it just right - if there is too much flour it is more complicated. :) You don't want your dough to be wet but soft and elastic.

Transfer to a clean glass bowl that has been sprayed with no-stick (and cover with plastic wrap that has also been sprayed with no-stick) and let rise until it is about 1 and a half it's size. I like to turn my oven on to 200 degrees and once it's warm, shut the oven off and throw the glass bowl in there to help it rise.

After it's risen, punch down the dough, put it back on your floured surface and knead a couple of times.

Using a large knife, cut the dough in half.

Fold the ends in a couple of times to make a nice loaf shape.

Spray two bread pans with no-stick and transfer your loaves.

Let them rise again for about an hour.

Preheat your oven to 350 degrees and bake for about 35 minutes.

If you tap the top of your loaf, it should sound hollow.

Let cool in the pans for 10 minutes and then take them out of the pans to cool the rest of the way.


Two loaves is a lot to eat in the couple of days before it would go stale, so i slice them both up, wrap them generously in plastic wrap, throw them in a plastic freezer bag and keep them in the freezer until we want some toast!


Sunday, June 12, 2011

Strawberries!

I just wanted to share my strawberry success! I really didn't do much other than plant them as instructed and water them a lot, but I am please to report that I have over THIRTY strawberries thriving right now. There are two red ones right now, but I thought I would give them another day to juice up before I pick them. I can't wait to enjoy the bounty!

Friday, June 10, 2011

Homemade Wheat Thins

For this post I will be taking you to another blog because she outlined this recipe so well. The original recipe was from King Arthur Flour. I did exactly as Ellie said in her blog post and I encourage you to do the same! And note: I do NOT have a food processor so I did it all in our blender. Not ideal, but it worked. It was worth it for such a great snack. I love that they have the full wheat flavor without any of the preservatives. Enjoy!

Friday, May 6, 2011

Healthy Quinoa Muffins

I found this recipe on Martha Stewart's website and was very pleased with the original. The recipe below includes the changes I made to make it even healthier. I enjoyed these muffins best right out of the oven. Since they are a little denser I would suggest eating them within a day or two. I didn't try the freezer option (freeze and eat later), although I am sure that would be great too. They were warm, crumbly, brown sugar sweet and delicious!

1 cup quinoa, rinsed - makes a little extra so feel free to do a shy cup

3/4 cups all-purpose flour

1 cup whole wheat flour

2 tablespoons flaxseed meal

3/4 cup packed dark-brown sugar

1 1/2 teaspoons baking powder

1 teaspoon salt

3/4 cup dried cranberries

3/4 cup milk

1/4 cup vegetable oil

1 large egg

1 teaspoon pure vanilla

Preheat oven to 350 degrees. In a medium saucepan, bring quinoa and 1 cup water to a boil. Reduce to a simmer; cover, and cook until water has been absorbed and quinoa is tender, 11 to 13 minutes. Leave lid on for a couple more minutes just for good measure. You don’t want the seeds crunchy!

In a medium bowl, whisk together flours, sugar, baking powder, salt, dried cranberries, and 2 cups cooked quinoa; reserve any leftover quinoa for another use.

In a small bowl, whisk together oil, milk, egg, and vanilla. Add milk mixture to flour mixture, and stir just until combined; divide batter into paper muffin cups.

Bake until toothpick inserted into the center of a muffin comes out clean, 25 to 30 minutes. Cool muffins in pan, 5 minutes; transfer to a wire rack to cool completely.

Friday, April 15, 2011

Lactation Cookies

For those breastfeeding moms out there, here is a recipe that is not only tasty and healthy (for a cookie), but helps with your milk supply! The brewer's yeast is essential, so don't think you can leave it out.

Also, if you measure your maple syrup in the 1/4 cup measure (only half of it though) BEFORE you measure your honey, it will help the honey just fall out and there won't be much scraping!

Lactation Cookies

3 tablespoons butter, room temperature

1/2 cup packed brown sugar

1/4 cup honey

1/8 cup pure maple syrup

1 egg

1 tablespoon water

1/2 cup whole wheat flour

4 tablespoons brewer’s yeast

1 tablespoon flax seed

1/2 teaspoon salt

1/4 teaspoon baking soda

1 1/2 cups rolled oats

1 /2 cup dried cranberries

1 /4 cup raw sunflower seeds


Combine the butter, sugar, honey, syrup, egg and water and mix well. Adding to the bowl, add the flour, yeast, flax seed, salt and baking soda. Once that is incorporated, mix in the oats, sunflower seeds and cranberries. Bake at 350 degrees for 10-12 minutes. Cool and eat as many as you want!


Sunday, April 3, 2011

Chicken Curry


Chicken curry has found it's place in our food rotation and we love it! It only takes about 20 minutes to prepare. I have adapted this recipe from Real Simple. We made it a little lighter and the sauce more to our liking. The original recipe is delicious too though! It can be found HERE.

  • 1 large boneless, skinless chicken breast or 2 thighs
  • 2 tablespoons curry powder
  • 1/4 teaspoon ground cinnamon
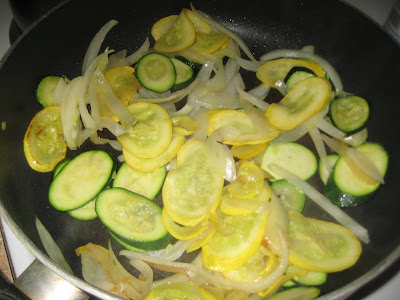
  • 1 medium yellow onion, thinly sliced
  • 1 medium zucchini, thinly sliced
  • 1 medium yellow squash, thinly sliced
  • 1 tsp low-sodium chicken bouillon
  • 1 can light coconut milk
  • 1/2 cup plain yogurt
  • 1 1/2 teaspoons kosher salt
  • 1/4 teaspoon black pepper
  • Cooked white rice
  • 1/2 cup fresh basil leaves, torn
  • 1/4 cup (1 ounce) almonds, roughly chopped

Saute zucchini, squash and onions in some olive oil.
Toss the chicken with the curry and cinnamon.
After the vegetables are cooked to your liking, remove and fry up the chicken.
Combine the vegetables and all the rest of the ingredients. Let simmer for about 10 minutes and serve! See how easy it is?

Friday, April 1, 2011

Homemade Granola

One of my favorite snacks is granola. I like being able to control what is in the food I eat so I decided to make my granola myself. I have been enjoying this recipe for quite some time now and have made a few adjustments to my liking. It has been adapted from joyofbaking.com.

Homemade Granola Recipe:

3 cups old-fashioned rolled oats (not instant)

1 cup chopped or slivered raw almonds

1/2 cup raw sunflower seeds

2 tablespoons wheat germ

1 tablespoon flax seed

1 tablespoon ground cinnamon

1/4 teaspoonsalt

2 tablespoons butter, melted

1/2 cup pure maple syrup (preferably Grade A Dark Amber)


I chopped up my whole almonds.
Definitely use pure maple syrup! It is so much better for you and taste better too.
Mix all your dry ingredients.
Separately mix together the syrup and melted butter. Add to dry ingredients and mix until well incorporated.
Cover cookie sheet with a piece of parchment paper and evenly layer the granola. Bake at 325 degrees for 30-45 minutes (depending on how done you like it), stirring it every 15 minutes. If you like it crunchy, watch it closely! It will go from done to burnt very quickly. Let the granola cool, break up the chunks and store in a plastic bag in the refrigerator. Enjoy!