My list of things to do. Stay tuned!


Make a hollow book
Sew a quilt out of T-shirts
Make mittens out of old sweaters
Cook more with whole grains
Make framed jewelry holder
Make shirt embellishments
Sew window curtains

Thursday, November 24, 2011

Jam Filled Tea Cakes

My cousin decided to take a year and bake through Martha Stewart's cupcake book. The end of the year is quickly approaching (and she was asked to supply cupcakes for a friend's wedding), so she reached out to see if others would help her reach her goal. I volunteered. I chose these cakes, and they didn't quite turn out like the picture but tasted great.

Orange zest was nice addition to regular batter
In the background of this picture you will see beaten egg whites. The way to get successful fluffy whites is to make sure your bowl and beaters are very clean and the egg whites are room temp. You can always add a pinch of cream of tarter to stabilize. When I need beaten egg whites, I always do those FIRST and then cream the other stuff, without bothering to clean the beaters. The only trick is that you have to assemble the ingredients quickly or your white will lose their fluff.
I threw all the dry ingredients into the sifter
Used my leftover butter paper to prep my dishes. You can always put a hunk of butter on the paper if you think it needs more spread.
I put a layer down of the batter, jam in the middle and then batter around the edges and over the top.
It came out the perfect consistency with a crunchy crust on top. We ate these still slightly warm (which is the only way to eat cake if you ask me) and they were delicious. I would have been just as delighted with them without the frosting.
As you can see, the whole jam thing didn't quite work out. I felt like I put a nice amount of batter on the bottom so I am not sure what went wrong. It was a dang good fruit-on-the-bottom jam cake though!

Cheers.

Thursday, October 27, 2011

Cream of Mushroom Soup

I decided to do two big batches of cream of mushroom soup and freeze it so I could have it on hand. It is too easy to skip...not to mention you know actually what is in and what is NOT in it.

Thanks to Amy for the inspiration!

Cream of Mushroom Soup

8oz fresh mushrooms
4TBSP butter
4 cups milk
1/2 cup flour
1 tsp salt
1 tsp pepper
2 tsp parsley
1 tsp onion powder
1/2 tsp garlic salt

Depending on the size of mushroom chunks you perfer, chop your mushroom. Know that they do cook down significantly. I don't mind chunks, so I always do a rough chop.
Saute your mushrooms in the butter and when they are almost done, throw in the spices. In the mean time, mix together your flour with 1 1/2 cups milk. Stir it until smooth and add it to the mushrooms.
Slowly stir in the remainer of the milk and wisk occasionally. Cook until it's almost the consistancy you want because as is cools it will thicken even more. Once it's done, taste it to be sure you don't need more spice, then throw it in freezer bags and freeze until you need it!

Thursday, September 8, 2011

Canning Day

Yesterday was canning day. I was offered free apples if I wanted to pick them, and I didn't hesitate. After returning home with 10 bags full of apples I knew I needed to have a plan. I called my friend to see if she wanted to help can and share in the spoils. There ended up being three of us and we still didn't get to all the apples. We worked tirelessly for 6 hours though, and will have applesauce to last us the winter! I hope to make apple butter tomorrow with the rest of them.

First we peeled and quartered the apples (taking out the cores).
The large pot covered both the burners on that side and we had the burners going on full blast for almost 5 hours. The smaller pot is applesauce in the works. It really isn't too hard. You add water, sugar and spices and let boil for 20 minutes.
You want the jars to be hot when you fill them up with the goods, so Reilly and I loaded the dishwasher.

I don't have pictures of this but you fill your jars with the food, screw them on as tightly as you can and then boil them to get the jars to seal.

After we were done with the apples we moved onto peaches and made peach jam. It is SO good. I had some for breakfast.
I ended up with a third of the jars and that included 9 jars of peach jam, 4 jars of apple pie filling and 6 jars of applesauce.

Wednesday, July 6, 2011

Homemade Wheat Sandwich Bread


Greetings.
I finally found a morning full of motivation and whipped up some bread loaves to get us through the next couple of weeks. Although I have included the recipe below, if you are a beginner baker I would strongly recommend looking at this post which is the original recipe that I have since adapted. There are step by step pictures and instructions that are amazing for your first bread experience. In the original recipe she made white sandwich bread, but below you will find my wheat version. It is not whole wheat, but it is the healthiest, easiest version I have come across so far. I have tried baking 100% whole wheat breads before but they take a lot more time (some recipes up to two days), and I'm not convinced it's worth it. If I do find a recipe that's worth it, I'll be sure to share.

NOTE: If you do not have wheat gluten on hand I would probably just make the white flour version (from the original site). The gluten helps your wheat to rise and ensures you get a soft baked texture. If you do not include it, your bread won't rise as well and will be dense.

2 cups lukewarm water (think of it as a nice bath for your yeast)
2 Tbls. sugar
1 Tbls. dry active yeast
2 Tbls. butter, softened
3 cups all purpose flour + more for kneading the dough
2 cups whole wheat flour
2 Tbls. wheat gluten
1 Tbls. kosher salt

Mix water and sugar - wisk

Add yeast to mixture - wisk

Let it sit for about 5 minutes to make sure your yeast is alive. It should have bubbles and start to look creamy.

Cut up the butter and add to bowl along with all the other dry ingredients. You will want to spoon your flour into the measuring cup and level it off with a knife to be the most accurate.

Use a spatula to mix it as well as you can, then transfer to a floured surface and knead for about 8 minutes. You might need to add more white flour depending on how absorbent your wheat flour is. I have the flour measurements this way because you can always add more flour to get it just right - if there is too much flour it is more complicated. :) You don't want your dough to be wet but soft and elastic.

Transfer to a clean glass bowl that has been sprayed with no-stick (and cover with plastic wrap that has also been sprayed with no-stick) and let rise until it is about 1 and a half it's size. I like to turn my oven on to 200 degrees and once it's warm, shut the oven off and throw the glass bowl in there to help it rise.

After it's risen, punch down the dough, put it back on your floured surface and knead a couple of times.

Using a large knife, cut the dough in half.

Fold the ends in a couple of times to make a nice loaf shape.

Spray two bread pans with no-stick and transfer your loaves.

Let them rise again for about an hour.

Preheat your oven to 350 degrees and bake for about 35 minutes.

If you tap the top of your loaf, it should sound hollow.

Let cool in the pans for 10 minutes and then take them out of the pans to cool the rest of the way.


Two loaves is a lot to eat in the couple of days before it would go stale, so i slice them both up, wrap them generously in plastic wrap, throw them in a plastic freezer bag and keep them in the freezer until we want some toast!


Sunday, June 12, 2011

Strawberries!

I just wanted to share my strawberry success! I really didn't do much other than plant them as instructed and water them a lot, but I am please to report that I have over THIRTY strawberries thriving right now. There are two red ones right now, but I thought I would give them another day to juice up before I pick them. I can't wait to enjoy the bounty!

Friday, June 10, 2011

Homemade Wheat Thins

For this post I will be taking you to another blog because she outlined this recipe so well. The original recipe was from King Arthur Flour. I did exactly as Ellie said in her blog post and I encourage you to do the same! And note: I do NOT have a food processor so I did it all in our blender. Not ideal, but it worked. It was worth it for such a great snack. I love that they have the full wheat flavor without any of the preservatives. Enjoy!

Friday, May 6, 2011

Healthy Quinoa Muffins

I found this recipe on Martha Stewart's website and was very pleased with the original. The recipe below includes the changes I made to make it even healthier. I enjoyed these muffins best right out of the oven. Since they are a little denser I would suggest eating them within a day or two. I didn't try the freezer option (freeze and eat later), although I am sure that would be great too. They were warm, crumbly, brown sugar sweet and delicious!

1 cup quinoa, rinsed - makes a little extra so feel free to do a shy cup

3/4 cups all-purpose flour

1 cup whole wheat flour

2 tablespoons flaxseed meal

3/4 cup packed dark-brown sugar

1 1/2 teaspoons baking powder

1 teaspoon salt

3/4 cup dried cranberries

3/4 cup milk

1/4 cup vegetable oil

1 large egg

1 teaspoon pure vanilla

Preheat oven to 350 degrees. In a medium saucepan, bring quinoa and 1 cup water to a boil. Reduce to a simmer; cover, and cook until water has been absorbed and quinoa is tender, 11 to 13 minutes. Leave lid on for a couple more minutes just for good measure. You don’t want the seeds crunchy!

In a medium bowl, whisk together flours, sugar, baking powder, salt, dried cranberries, and 2 cups cooked quinoa; reserve any leftover quinoa for another use.

In a small bowl, whisk together oil, milk, egg, and vanilla. Add milk mixture to flour mixture, and stir just until combined; divide batter into paper muffin cups.

Bake until toothpick inserted into the center of a muffin comes out clean, 25 to 30 minutes. Cool muffins in pan, 5 minutes; transfer to a wire rack to cool completely.

Friday, April 15, 2011

Lactation Cookies

For those breastfeeding moms out there, here is a recipe that is not only tasty and healthy (for a cookie), but helps with your milk supply! The brewer's yeast is essential, so don't think you can leave it out.

Also, if you measure your maple syrup in the 1/4 cup measure (only half of it though) BEFORE you measure your honey, it will help the honey just fall out and there won't be much scraping!

Lactation Cookies

3 tablespoons butter, room temperature

1/2 cup packed brown sugar

1/4 cup honey

1/8 cup pure maple syrup

1 egg

1 tablespoon water

1/2 cup whole wheat flour

4 tablespoons brewer’s yeast

1 tablespoon flax seed

1/2 teaspoon salt

1/4 teaspoon baking soda

1 1/2 cups rolled oats

1 /2 cup dried cranberries

1 /4 cup raw sunflower seeds


Combine the butter, sugar, honey, syrup, egg and water and mix well. Adding to the bowl, add the flour, yeast, flax seed, salt and baking soda. Once that is incorporated, mix in the oats, sunflower seeds and cranberries. Bake at 350 degrees for 10-12 minutes. Cool and eat as many as you want!


Sunday, April 3, 2011

Chicken Curry


Chicken curry has found it's place in our food rotation and we love it! It only takes about 20 minutes to prepare. I have adapted this recipe from Real Simple. We made it a little lighter and the sauce more to our liking. The original recipe is delicious too though! It can be found HERE.

  • 1 large boneless, skinless chicken breast or 2 thighs
  • 2 tablespoons curry powder
  • 1/4 teaspoon ground cinnamon
  • 1 medium yellow onion, thinly sliced
  • 1 medium zucchini, thinly sliced
  • 1 medium yellow squash, thinly sliced
  • 1 tsp low-sodium chicken bouillon
  • 1 can light coconut milk
  • 1/2 cup plain yogurt
  • 1 1/2 teaspoons kosher salt
  • 1/4 teaspoon black pepper
  • Cooked white rice
  • 1/2 cup fresh basil leaves, torn
  • 1/4 cup (1 ounce) almonds, roughly chopped

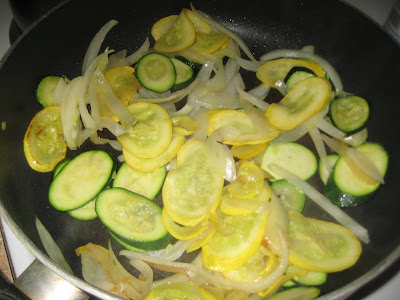
Saute zucchini, squash and onions in some olive oil.
Toss the chicken with the curry and cinnamon.
After the vegetables are cooked to your liking, remove and fry up the chicken.
Combine the vegetables and all the rest of the ingredients. Let simmer for about 10 minutes and serve! See how easy it is?

Friday, April 1, 2011

Homemade Granola

One of my favorite snacks is granola. I like being able to control what is in the food I eat so I decided to make my granola myself. I have been enjoying this recipe for quite some time now and have made a few adjustments to my liking. It has been adapted from joyofbaking.com.

Homemade Granola Recipe:

3 cups old-fashioned rolled oats (not instant)

1 cup chopped or slivered raw almonds

1/2 cup raw sunflower seeds

2 tablespoons wheat germ

1 tablespoon flax seed

1 tablespoon ground cinnamon

1/4 teaspoonsalt

2 tablespoons butter, melted

1/2 cup pure maple syrup (preferably Grade A Dark Amber)


I chopped up my whole almonds.
Definitely use pure maple syrup! It is so much better for you and taste better too.
Mix all your dry ingredients.
Separately mix together the syrup and melted butter. Add to dry ingredients and mix until well incorporated.
Cover cookie sheet with a piece of parchment paper and evenly layer the granola. Bake at 325 degrees for 30-45 minutes (depending on how done you like it), stirring it every 15 minutes. If you like it crunchy, watch it closely! It will go from done to burnt very quickly. Let the granola cool, break up the chunks and store in a plastic bag in the refrigerator. Enjoy!

Thursday, March 31, 2011

More Quinoa


We tried a new recipe last night!

1 3/4 cup water
1 cup uncooked quinoa
chopped tomato
chopped green onion
juice from 1 lemon
fresh parsley
salt and pepper

Boil the water and quinoa and then simmer for 20 minutes. Throw in all the other ingredients in the amounts that you like and serve either chilled or at room temperature. Clearly it is super easy but it still tasted great! Very summery and light.

I am a big fan of Costco and here is yet one more reason. I bought a 4lb bag of organic quinoa for $9.50! At a regular grocery store you can't even get 2lbs at that price. Go. Buy some. Enjoy this super grain that has so many health benefits.

Sunday, March 27, 2011

Car Seat Cover

I saw a friend with a car seat cover and thought it was a great idea. My daughter is too big now for this size car seat but another bundle of joy came along two weeks ago to a friend so I thought it was a great reason to give the car seat cover a try!
Sorry I can't figure out how to flip the picture around.
I ended up doing roughly 35in x 35in with the top fabric slightly longer to give room for one more seam. I cut the top panel in half to sew on the loops, put the other panel on the back and went around the edges with the green fabric. I was going to use velcro for the loops, but I bought the one kind that was not recommended for fabrics! Luckily I was already borrowing a friend's pliers and snap assortment, so I just threw some snaps on. I also did stitch in the ditch of the middle seam so the inside fabric wasn't falling into the baby's face. All in all I think it turned out pretty well. Hopefully little Logan will sleep like a baby inside!

Wednesday, March 9, 2011

Quinoa Experiment

Here is my second experiment with quinoa! I really like the idea of eating quinoa because variety is the spice of life and quinoa is so good for you! The recipe I used was for Double Broccoli Quinoa and it turned out great! I also made a spiced salmon and yogurt biscuits because they are my Love's favorite. Whenever I ask if he wants yogurt biscuits he NEVER says no.

I didn't follow the recipe exactly, but tweaked it to my liking!
Have I posted yet about my toaster oven being my favorite kitchen appliance? I use it for just about EVERYTHING, even cake! I found this cute little dish ( which is a nice size for many things ) and used it for cake in the toaster oven. It came out perfectly: slightly dense and chewy but sweet and delicious. I rarely frost my cakes because I prefer to eat them warm out of the oven. The sweet hints inside the cake are just enough that it doesn't even need the frosting.
Here is the recipe:

1/4 cup butter, softened
1/2 cup sugar
1 egg
1/4 cup milk
1/4 tsp pure vanilla
juice and zest from one lemon
1 cup flour
1 tsp baking powder

Cream the butter and sugar until fluffy. Mix in egg, milk, vanilla, lemon juice and zest. Put flour and baking powder together in sifter and sift into the batter. Mix until combined and bake in toaster oven at 350 degrees for 25-30 minutes.

If you live near a costco you should grab a 10 pound bag of organic sugar there because it is only 89 cents a pound. That's a steal!
For the milk I used vanilla flavored almond milk and omitted the vanilla.
And a shout out to Land O Lakes butter for doing the quarter cup butter sticks. LOVE them.


Friday, March 4, 2011

Big Booty Pants

I got the notion to make some pants for my little one that fit over her cloth diaper a little bit better than then normal pant. I traced a pair of pants that already fit her well and made a few adjustments to my liking. I plan to make some out of denim, but I wanted to try out my pattern first before taking a chance on the more expensive fabric.
To make the pants cozier, I lined them with fleece.
What a cute bum!
Next time she wears the pants, I'll make sure everything matches.

I need to get the kinks out before I share the pattern, but hopefully it will be soon!

Monday, February 21, 2011

An Apron for Inspiration

I have been wanting to try my hand at an apron. I don't need another apron, so I kept talking myself out it. Then I got brilliant and decided I would make one for my sister! She is venturing more into the cooking world, and a cute apron might be just what she needs for inspiration! I started scouring clearance fabrics and found this heavier blend for only $3 a yard. I bought 1.3 yards of the main fabric, and 12 inches of the striped. This project cost me less than $4 to make, as well as cost me a seam ripper because I broke mine. I was using it as a multi-purpose tool and not ripping seams. I have learned my lesson.
I traced an apron I own and cut the pattern out of brown paper bags. It was a very sophisticated procedure. Just make sure you cut your pattern large enough to allow room for seams! I also did a larger fold on the top of the apron, so give yourself a few inches there. I didn't measure anything, just eyeballed. My sewing habits are probably a disgrace to the sewing community, but it gets the job done. And, when you have gingher shears to use, it makes you want to cut fabric all day long! What a lovely gift from my husband a few years ago.
I rolled the ends in to make a nice edge and ironed them down. This fabric really worked out in my favor since I don't like using pins. It held the fold beautifully. After ironing, sew along the edges, including the top fold.

I cut out the piece that holds the strap, making sure I had the curve going the right way for the fabric.

Putting right sides together (I used two needles to secure it just to be safe) I sewed along the curve. Repeat for other side.
Then iron the fold down and roll the unfinished edge to make a nice finished seam. I don't usually give myself very large seam allowances, but if you like to make sure you cut your pieces larger.

I cut strips 2.5 inches wide and totaling 110 inches long. The fabric I was using wasn't long enough for the 110 inches so I sewed the pieces together at an angle. Also, if you need to piece three together like I did, you can make the center piece a nice 33 inches and then your seams will be hidden inside the arm slots.

I folded both edges down and then folded again and ironed it all. This was the part of the project where I realized I really could use some pins. Instead I used bobby pins and paper clip thingys. They did the trick.

To make the pockets I cut out a rectangle (didn't measure though, just made sure it was straight) and then cut out strips to sew around it. The edge you see on the finished one was the seam allowance I gave, and then I just folded the fabric around it and ironed. The top of the pocket got stitched down, but I waited to stitch the rest of it until I was sewing it on the apron, and therefore only had to do it once. Sew the bottom strip first and cut the side strips longer to fold them under the bottom strip as well. I did the top strip last and made that a larger piece with a larger seam allowance.
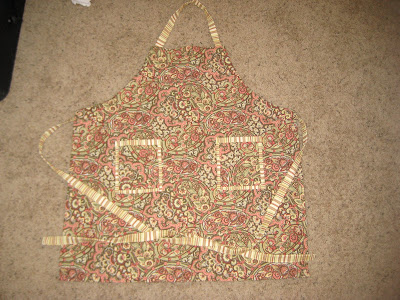


I did measure the apron to make sure I was getting the pockets centered, because I really did not want to do that twice. I then sewed around the three edges of each pocket and wove the straps through the slots. This project did take me a good four hours, but I wasn't completely dedicated. I had to tend to a little baby as well. It turned out to be very easy, and I am super proud of it. Hope you like it, Sis!

Here is the larger fold at the top of the apron, and how the arm slots turned out. Not bad!


Saturday, February 12, 2011

Alfredo Delicious


Tonight we experimented with homemade Alfredo Sauce! Here is the recipe we used:
  • 1/4 cup butter
  • 1 cup heavy cream
  • 1 1/2 cups freshly grated romano cheese
  • 1 clove fresh garlic, crushed
  • fresh pepper to taste

The cheapest place we've found cheese is actually Whole Foods, so that is where this lovely cheese is from. For 1 1/2 cups of shredded cheese, you will need a block that is roughly a third of a pound.
After melting the butter in our double boiler, we added the cream.
Since my hands swell up from raw shrimp, my DH did the peeling honors.
We didn't have any fettuccine but the next best thing is whole grain rotini! We wisked the cheese in for probably ten minutes so we wouldn't have chunks. It also thickened nicely once it cooled slightly.
The finished product was delicious! Very cheesy, rich and not healthy at all! I was going to add a healthy veggie on the side, but it got vetoed. We'll eat our veggies tomorrow.
And here is my late afternoon treat and I just had to share the recipe with you all. These are my favorite cookies of all time : White Chocolate, Strawberry, and Oatmeal Cookies
In our house, we like to make a full batch of cookie dough, scoop out all the portions and throw them in the freezer. We can have a fresh cookie or two whenever we feel like it and only heat up the toaster oven to do it. I feel like that was one of my best ideas EVER. At least I think it's mine.